Thursday, June 25, 2015

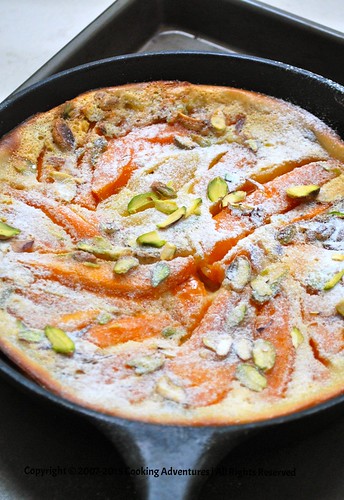
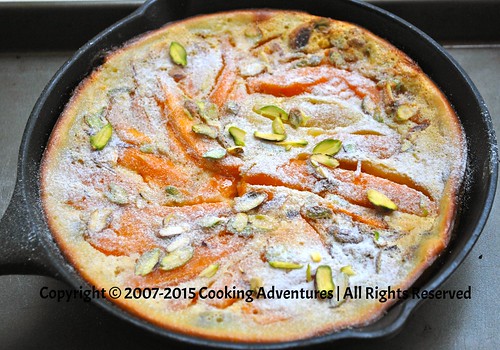
Mango Ginger Clafoutis

DSC_0046

We are having a great mango season here. First it was the king of mangoes, Alphonso, that we savored during our vacation with my parents and in laws. Growing up we always ate Alphonso….I mean buying any other variety back then was crime!! Having moved to Gujarat, we didn't quite get the awesome Alphonso mangoes that we had access to in Pune or Mumbai. We bought some locally available Kesar variety, albeit, with some frown. It took us a while to accept the taste but boy are we in love with it or what!! They are oh so good!!! In fact the best variety for baking, I think! Their natural sweetness means less added white sugar. They are juicy yet not the mushy types which gives the perfect moistness to cakes. What more can you ask for?

We started with some homemade mango ice cream, followed by mango panna cotta, then a super moist and delicious mango raisin tea bread and now we are trying hard to keep our forks off of this mango ginger clafoutis as I am quickly trying to take pictures!!

I loved making this clafoutis, it was a breeze, with ingredients readily available in the kitchen! That I got to use my favorite cast iron skillet to bake the clafoutis in was like the icing on the cake!!

DSC_0049

Ingredients:

1 1/4 cup whole milk
1/2 cup sugar, divided
1/2 cup all purpose flour
2 medium eggs
1/4 tsp ginger root powder
1/4 cup pistachios, sliced
1 large OR 2 medium ripe mangoes, cubed or sliced
Powered sugar for dusting

Method:

Preheat oven to 175 deg C. Butter an 8 inch cast iron skillet and set aside.

In a blender process,  milk, 1/4 cup sugar, flour, eggs and ginger root powder until well combined.

Pour a thin layer of this batter in the cast iron skillet and bake for about 5-7 min until set. Remove from the oven.

Arrange the fruit on the batter, sprinkle with remaining 1/4 cup sugar and nuts, pour the rest of the batter on top of the fruit and nuts and bake for an additional 45 to 50 min until set and knife inserted in the center comes out clean.

Dust powdered sugar on the top and serve warm with lightly sweetened cream or ice cream.

Notes:

1. You can bake this clafoutis in any regular baking tin. Just keep in mind the size of the tin that you are using. Adjust baking time accordingly.
2. Substitute mangoes with any stone fruit or berries.
3. I feel pistachios pair very well with mangoes but almonds or even cashews would taste great.
4. The quantity of ginger root powder that I have added gives the clafoutis a very subtle ginger flavor. You can add up to 1/2 tsp ginger root powder for a stronger ginger flavor.

Monday, March 2, 2015

Mixed Whole Grain Crackers


Easy to make, healthy for your body and a recipe that uses ingredients that are easily found in any kitchen, these crackers are surely getting added to our repertoire of home made snack supplies. The spices used in here can be easily substituted with what your family prefers. I think any nut meal can also go in place of one of the flours. 

These days, "Mama, I am hungry!" echos through the house at any hour of the day. The five year old is off school for a week due to swine flu outbreak. Any time I ask her to do something, she says "Mama, I am hungry!". She loves gulping down gallons of milk and the minute she has a glass of it, claims to have gotten rid of some imaginary body ache. Of course, it goes without saying that she never feels hungry if I let her watch TV!! LOL…the other day, she said I don't feed her enough and so her knee hurts! The same day my husband said, "Spare her, don't stuff her like a twenty five year old, she is only five!!" What a day full of such comedy conversations!! After a pretty rough patch, I am finally loving being a SAHM. Would be missing so much of innocent humor in my day, had I been unlucky enough to sit in front of the computer at work all day long! 


So after one such "I am hungry" episode, I set out to make these crunchy crackers. Prep done half hour before the kids went down for a nap, these crackers were a breeze!! It took me a bit long to complete the task as I own only one cookie sheet. But if you have more than one and can fit them in your oven, then in thirty minutes you can sit down to savor these delicious crackers!! I did plan on a creamy veggie dip originally but that never happened!! Just blame the younger one, he woke up earlier than expected!!!


Mixed Whole Grain Crackers

Ingredients:

2/3 cup whole wheat flour
2/3 cup amaranth flour
2/3 cup oats
1 TBS kasoori methi, crushed between the palms of your hands
1/2 tsp freshly cracked black pepper
1 tsp salt
3 TBS oil (I used filtered groundnut oil but olive, sunflower, canola oil would do as well)
Water, as needed
1 TBS Onion seeds or sesame seeds (optional)

Method:

In a mixing bowl, mix all the ingredients up to salt. Add oil and gently mix it with the dry ingredients. Now slowly add water as needed to form a soft yet firm dough.

Let the dough rest for 15 minutes. Then divide into four equal parts. With the help of a rolling pin, roll each part in to a thin disc (about 1-2mm thickness). Sprinkle some onion or sesame seeds on top and then gently roll again to firmly press the seeds on the disc. Cut in to 12 equal parts with the help of a knife.

Preheat oven to 150 Deg C. Till the oven pre heats, arrange the cut crackers on a cookie sheet lined with parchment paper.

Bake for 10 min until golden brown. Remove from oven, flip the crackers and bake for another 5 minutes until crisp. Leave on the cookie sheet for another 5 min, then transfer to cooling racks to cool completely. Once cooled, immediately transfer to an air tight container.

Makes about 4 dozen crackers.

Serving:

Serve with your favorite dip. Should stay crisp in an air tight container for about 4-5 days, if they last that long!

Friday, February 27, 2015

Whole Grain Apple Cranberry Loaf Bread


Eight years back when I started this blog, I had nothing to offer in the baking department. I had in the past goofed up several cake bakes by substituting baking soda with baking powder, reducing the flour called out in the recipes as per my wish, adding liquid beyond imagination. You get it, right? I didn't know a thing about baking!

Slowly things (read "luck") changed. Getting inspired by professionals like Ina Garten, Martha Stewart and a few fellow bloggers, I learnt a few things about baking! Number one being….."stick to the recipe". Yet, the imprudent baker that I was, I tried a banana nut bread with some substitutions in the original recipe, that came out of the oven fabulous…. not once or twice but several times!!! A few more attempts with other bakes came out well. The baker in me was on fire but little did I know that I was only on my way to mess up a few more cakes!!! Luck had changed again and I parted ways with baking.

A few years after our big move back to India, I got a small Morphy Richards oven to be able to make veggie bakes, enchiladas, pasta etc. I was pretty happy with my oven. I decided to try my luck with my very trusted banana nut bread!! Voila! It came out great yet again! A few other cakes were tested and they tasted great…..then came the call by Kitchen Aid asking home bakers to send their entires to Pro baker 2015!! Suddenly a burst of energy rose inside me…..it was time to stop trying recipes and instead create some!! Too early to be so confident but I had some kind of gut feeling about getting this one right. 

This whole grain apple cranberry bread needs a little introduction! An idea that captured my mind for a whole month now, a recipe that was developed over a week with a lot of reading on quick breads. I agree that the recipe is not very uncommon but when you develop something on your own with a lot of thinking going behind the recipe, it becomes very special to you!! And it becomes even more special  when the risen cake does not collapse in front of your eyes, no power cuts during baking, both kids asleep during the entire prep, bake and cooling process (yay!). Was that luck or what?? My sudden impulsive on the spot decision to reduce an egg and add yogurt instead worked very well too. I think it gave the bread a nice crumb. The sweet local apples pair beautifully with the slightly tart cranberries. Walnuts provide a nice crunch to this moist crumbly bread. The addition of whole wheat convinces you to reach for guilt free second servings!! It tasted even better the next day as the flavors matured. And I was on cloud nine when my 5 year old girl said, "Mama, when will you make this bread again?"

This is my entry for Kitchen Aid's Probaker 2015! Come participate and have fun!


Ingredients:

Whole Grain Apple Cranberry loaf bread-
1 cup whole wheat flour
3/4 cup all purpose flour
2 tsp baking powder
1/2 cup unsalted butter, room temperature
3/4 cup demerara sugar, firmly packed
1 egg, room temperature
1/2 tsp vanilla bean powder OR 1 tsp vanilla extract
1/2 cup apple sauce (recipe follows)
1/4 cup homemade yogurt, room temperature
2 medium sized apples cored, peeled and diced
1/2 cup dried cranberries, coarsely chopped (I left a few whole)
1/4 cup chopped walnuts

Glaze-
1/4 cup powdered sugar
1-2 tsp milk

Method:

Grease and flour a 8 1/2 X 4 1/2 X 2 3/4 loaf pan. Line bottom with parchment. Preheat oven to 175 deg C.

Sift wheat flour, flour, baking powder thrice. Reserve.

With an electric beater cream butter and sugar until light and fluffy. Add egg and mix well. Beat in vanilla bean powder followed by apple sauce and then the yogurt.

Now add the reserved flour mixture and with the beater on low, mix just until incorporated. Do not over beat at this point.

Fold in the diced apples, cranberries and walnuts. The batter will be quite thick!

Pour batter into the prepared loaf pan and even out the top. Keep the pan on a cookie sheet and bake in the preheated oven for 25 minutes. After 25 minutes remove the loaf pan and place on to another empty loaf pan of the same size and bake for another 25 minutes or until tester comes out clean. Alternately you can bake at a lower temperature (165 Deg C) until the tester comes out clean.

Let the bread cool in the pan for about 10 minutes, then remove on to cooling rack to cool completely before slicing.

Mix the ingredients for the glaze and pour on top of the loaf bread. Let some glaze drip on the sides.

Serving:

Cut think slices and enjoy with your morning tea or coffee. The flavors mature the next day and the bread tasted even better making this a perfect make ahead dish for a brunch party.

Notes:
*If not using the glaze, increase the sugar in the recipe to 1 cup.
*The bread stays well at room temperature for 1-2 days only. If yours lasts longer then store in the refrigerator.
*I think you can easily substitute the fresh fruit and dry fruits in the recipe with other ingredients of your choice. Let your imagination run wild!
*You could add a pinch of salt to the batter. I didn't.

Recipe for Apple Sauce-
2 medium apples, cored, peeled and diced
1 inch stick of cinnamon
4 cloves
1 TBS organic brown sugar
2 TBS water, if needed
1/4 to 1/2 tsp lemon juice

Method:
Put all the ingredients in a sauce pan and cook until tender and mushy. You can add a couple of tablespoons of water if needed. Fish out the spices and then mash with a potato masher or puree in your blender. Makes about 1 cup. Store any left overs in the fridge.


Thursday, June 13, 2013

Herbed Wild Rice with Goan Paneer Xacuti Curry


We recently visited Goa with some of our very close friends. The balmy beaches, the soft sand, the tall coconut trees and the twinkly night skies made the trip relaxing. We didn't get to explore much of Goan cuisine during our stay but we found enough time to browse through spices at a local market. One such spice mix that caught my eye was "Xacuti masala".

Ever since we got back, I have been wanting to make a curry with the Xacuti masala mix that we brought back with us. It all came along beautifully in this paneer curry with coconut milk as its base!! We found the flavors subtle and the spice mix does not overpower any other ingredients in the recipe.  If you want to make your own "Xacuti masala", there are plenty of recipes on the web or just ask a Goan!! I found that the nuttiness of the wild rice compliments the creamy texture of the curry, but plain rice will go along well too!

Ingredients:

For the Herbed Wild Rice-

1 cup uncooked wild rice (You can use basmati rice)
1/4 cup finely chopped raw mango
4 cloves of peeled garlic, chopped finely
Handful of mint leaves, roughly chopped
Handful of cilantro, roughly chopped
Sliced lemon
1 TBS butter
Salt to taste

For the Goan Paneer Curry-

1 TBS olive oil
1 TBS xacuti masala
1 bay leaf
1 cup coconut milk
1 pod green cardamon
1/4 tsp turmeric
1/4 tsp red chilli powder
1/2 tsp sugar
1/2 cup water
1 cup paneer, cubed (You can use tofu)
Salt to taste

Method:

Herbed Wild Rice-
Cook wild rice as per the instructions on the box. (I combined 1 cup rice, 2 cups water, 1 TBS butter, salt as per taste and bring it to a rolling boil, cover and simmer for 45 minutes)

Mix raw mango, garlic, mint, cilantro and lemon with the cooked rice just before serving.

Goan Paneer Curry-
Heat olive oil in a sauce pan. Add xacuti masala and bay leaf.

Then add the coconut milk and mix well. Add cardamon, turmeric, chill powder, sugar and water. Bring it to a slow simmer. Add salt as per taste.

Now add the cubed paneer and mix well. Simmer to about 5 minutes. Add more salt if needed.

Serving:

Serve the wild rice and curry, piping hot! You could also serve the curry with any bread/roti of your choice.


Friday, November 11, 2011

Asian Salad with Crispy Tofu


Asian salad with crispy tofu


We enjoyed this refreshing salad for a quick dinner last week. What I particularly enjoyed about this salad, was that everything can be prepared in advance and just tossed together before serving. The quantity below is just a rough guide, use your common sense, gut feeling and adjust for your taste.


Adapted from http://thematisametaphor.wordpress.com/2010/06/15/
Ingredients:
Romaine Lettuce
Half a red pepper, sliced
1/2 cup shredded carrots
Handful of sugar snap peas
1 cup broccoli florets, blanched in boiling water for about 2-3 min until just tender
1 TBS sesame seeds, toasted for topping

Toss everything except the sesame seeds and keep aside

For the crispy tofu
Extra firm tofu, quantity as needed, cut in triangles
1 cup water
1 TBS soy sauce
1 bay leaf
Whole wheat flour
Corn meal
Olive oil
Sesame oil

Bring the water, soy sauce and bay leaf to a boil, add the cut tofu and simmer for 20 minutes. Remove the tofu and let cool. Dredge the tofu in a mixture of wheat flour and corn meal. Heat some olive oil and sear the tofu until brown/caramelized on both sides. Toss some sesame oil on top.


NOTE: Tofu can be prepared up to 8 hours in advance. Warm the tofu again on a pan before serving if prepared in advance.


Dressing:
~2 TBS olive oil
1 tsp sesame oil
1 TBS soy sauce
Dash of sriracha sauce
1 clove of garlic, grated or minced
1 tsp grated ginger


Whisk everything together and toss with the salad just before serving

Method:

Toss the dressing with the salad just before serving. Arrange the warm tofu on top. Drizzle some toasted sesame seeds on top for a great garnish.

Thursday, September 22, 2011

Healthy Rustic Potpie

Not enough time to write a post today, but here is the recipe for the potpie made for dinner today! It was a great success and both my adult kid and two year old kid loved it...

Rustic potpie


Rustic Potpie
Serves 3-4 with a side salad


Ingredients:

2 TBS extra virgin olive oil
2 sausage or veggie sausage patties
2-3 cloves of garlic, finely minced
2 TBS chopped sun dried tomatoes in oil
1 medium sized sweet onion, chopped
4 spring onion, chopped, white and green
2 medium sized carrots, cubed
2 medium sized potatoes, cubed
1/2 cup frozen sweet peas, thawed
1/2 cup frozen corn, thawed
1 bunch kale, washed and finely chopped
Pinch of grated nutmeg
1-2 TBS cumin coriander powder
1 cup black eyed peas cooked OR 1 can black eyed peas, drained
1/2 cup cooked brown rice
Salt as per taste
1 sheet frozen puff pastry, thawed
1 egg, mixed with 1 TBS water, to use as an egg wash

Method:

In a large sauté pan, cook the patties on both sides until brown. Remove the patties and let them rest.

Then saute the garlic, sun dried tomatoes, sweet onions and spring onions over medium heat until the sweet onions are translucent.

Add carrots, potatoes, peas and corn, stir and cover. Continue stirring occasionally until cooked.

Add kale, stir and cook without covering for about 5-7 minutes. Add the nutmeg, cumin coriander powder and stir well.

Now add the black eyed peas, rice and sausage patties (cubed) and salt. Cover and cook for about 5 minutes, adding about 1/4 cup water if too dry.

Spread this mixture evenly in a 9X13 greased oven proof dish.

Sprinkle some flour on the counter and roll a sheet of puff pastry to fit the 9X13 dish. Cover the mixture with the sheet. Apply the egg wash with a pastry brush on to the pastry sheet. Sprinkle some salt on top if desired.

Bake in a 325 deg oven for about 20-25 min OR until the puff pastry is golden brown.

Serve:

Serve hot out of the oven.

Note: 
Can me made in to 4 individual portions.


Thursday, March 3, 2011

Okonomiyaki - Japanese Savory Pancakes

Okonomiyaki- Japanese Savory Pancakes

I was browsing for some recipes on the internet when I came across this word "Okonomiyaki" accidentally. I had never heard of Okonomiyaki, a Japanese savory pancake. It has several ingredients in it. The recipes that I stumbled upon looked easy and healthy. The word okonomi means "what you want" or "what you like". It happens to be a dish which is prepared right in front of you using your choice of ingredients(meat, vegetables etc.) It seemed like this one was going to give me plenty of opportunities to experiment with my ideas and play with a lot of ingredients!

The recipe that follows is an outcome of those ideas. As always, I have made quite a few modifications to the classic recipe. The batter is made of whole wheat flour with ground cumin, cloves and black peppers, making it more nutritious. Instead of serving it whole as any usual pancake, I cut it in quarters and stacked them up with a dab of soy sauce on each quarter. The panko gives the pancake a great crunch while the soy sauce gives it the perfect salty bite. We ate these delicious pancakes with a side of citrus salad.

Okonomiyaki - Japanese Savory Pancakes
Serves 2 with a side salad or soup

Ingredients:

1 cup whole wheat flour
1 1/2 to 2 cups water
1/2 tsp cumin, 1 clove and 4 black peppers, finely ground
1 egg, lightly beaten
1/4 head of a cabbage, thinly sliced
1/4 cup baby bella mushrooms, roughly chopped
1 medium carrot, peeled and grated
4 TBS panko (Japanese bread crumbs, can substitute regular bread crumbs)
1-2 TBS soy sauce
2-3 TBS extra virgin olive oil
Salt as per taste

Method:

Mix the flour and spices and add water as required to make a pancake-like batter.

Add the egg, vegetables, salt and stir.

Heat a medium sized (about 8 inch) skillet. Add 1 TBS olive oil. Pour half the batter in the pan and cook for 2 minutes. Sprinkle 2 TBS of panko on top. Cook for 8 to 12 minutes per side adding more oil if needed. NOTE: The panko topping is only on one side.

Use the same procedure for the remaining of the batter.

Serving:

Cut each pancake in quarters and stack on top of each other (panko topped side on top) with a dab of soy sauce on each quarter. Enjoy with a soup or salad.