Saturday, April 10, 2010
Whole Wheat Banana Walnut Bread
I am not a big fan of store bought baked goods. Most of the times, the ingredients in them sound more like some factory chemicals than anything edible. But because both Pratik and I are baked food junkies, not buying such ready-made cakes and desserts simply means creating them in our own kitchen. This is no doubt the best way to know exactly what goes in to the food that we eat!
Moreover, now that Myra has started demanding a piece of everything she sees on our plates, I knew it was time to start making healthier food with whole-grains and low-fat ingredients. While I found it relatively easy to incorporate nutritive options for her lunch and dinner, making baked snacks was where it was a little more challenging. While I am sure there are plenty of healthful options and recipes out there, my first option is always to tweak my tried and tested recipes in order to cut down the sugar and the butter, replace the regular non-nutritious flour with a higher food value alternative.
This whole wheat banana walnut bread is a result of one such tweaking experiment. The bread baked perfectly to give the desired texture and moistness. The walnuts provided a nice crunch in the background. But what really gives a kick is the sweet aroma from the bananas that fills the house while the bread is being baked. It teases you right from when those bananas ripen perfectly to be used in the bread, to watching the baked bread cool in the pan. But I can assure you, the end result if absolutely worth the wait!
Whole Wheat Banana Walnut Bread
Makes 1 loaf (about 10 slices)
Ingredients:
4 tbs unsalted butter, melted
1 cup sugar
1/2 cup unsweetened apple sauce
1 extra large egg, room temperature
1 tsp vanilla extract
1 tsp baking soda
1 cup all purpose flour
1 cup whole wheat flour
2 cups of banana, mashed (approximately 3 large bananas)
2/3 cup walnuts, toasted & roughly chopped (pecans can be substituted for walnuts)
Pinch of salt
Method:
Preheat oven to 350 deg F. Melt the butter in a microwave safe bowl. Dip a pastry brush in the melted butter and grease a 9x5x3 inch loaf pan & flour it.
Sift the flours, baking soda and salt in a bowl.
Add the sugar, apple sauce and vanilla extract to the melted butter and whisk until well mixed. Add the egg and whisk until well combined. Now add the bananas, flour mixture and walnuts one by one and mix just until all the ingredients are incorporated. It is important at this stage to not over mix the batter as this will result in a rubbery end product.
Pour the batter in the prepared loaf pan and bake for about 45 minutes or until the top is golden brown and a toothpick inserted in the center comes out clean. Cover the loaf pan with a foil tent if the top starts to turn dark before the bread has completed baking.
Let the bread cool in the pan before cutting. Remove on a cutting board and cut slices of desired thickness.
This bread tastes even better the next day with the aroma of the banana completely infusing the bread and giving it the desired body and moistness.
Serving:
Serve as a healthy light afternoon snack or have a slice with your hot coffee for breakfast. Munch on this at a picnic or neatly wrap a slice in a plastic wrap and eat your snack on the go!
Storing:
Cover in plastic wrap or air tight containers at room temperature for about 2 days or in the refrigerator for about 4-5 days.
Thursday, April 1, 2010
Pratik's Vegetarian Enchiladas
Wow! I cannot believe that Myra is already 10 months old. Now that was fast...wasn't I pregnant until last week?? Hmm...
In these past months, we have had our share of easy and tough days but never have we had a dull day. Thanks to the abundant activities we have around here in Albuquerque. Weekdays are full of musical activity classes, mom n baby yoga, toy library time and a few play dates. We are indeed having a ball. These activities are well designed and are definitely helping Myra grow into an affectionate, social and caring individual.
I feel good about being at home to give her the most deserved attention. There is a lot of work to do but with the amount of help and support that Pratik offers, even a regular day turns out to be very special. Like last Friday, Pratik got back home from work and surprised me with these flavorful enchiladas loaded with tons of healthy vegetables and decked up with a spicy salsa. Pratik's vegetarian enchiladas did a great job of taking the edge off from the weekly routine.
These enchiladas have five plus points.
Plus Point No.1 ...they are made of whole wheat tortillas.
Plus Point No.2 ...they are loaded with vegetables.
Plus Point No.3...they are a nice change from the regular bean and cheese version.
Plus Point No.4 ...they be easily made for two, four or a crowd alike.
Plus Point No.5 ...they come and go off the table like a breeze!
Pratik's Vegetarian Enchiladas
Serves 2 (as a complete meal)
Ingredients:
4 medium sized whole wheat tortillas
1 red bell pepper, cubed
1 zucchini, cubed
1 red onion, cubed
1 1/2 tsp cumin-coriander powder
1/4 cup pepper jack cheese, grated
1/4 cup sharp cheddar cheese, grated
1 cup spicy salsa, any good store bought variety
Salt & Pepper
Olive oil
Method:
Drizzle some olive oil in a non stick skillet. Turn the heat to medium high. Once the skillet is hot, drop the vegetables and saute until they are tender and start to caramelize. Add the cumin- coriander powder, salt & pepper and cook for another minute. Turn the heat off.
Pre-heat the oven to 350 deg F. Coat the bottom of an 8X8 baking pan with some olive oil. Arrange the four tortillas on the kitchen counter and coat the top side with some salsa. Stuff the tortillas with the vegetable and some sprinkling of cheese. Roll and arrange in the baking pan with the seam side down. Cover the tortillas with the remaining salsa and top with the rest of the cheese. Bake in the pre-heated oven for about 15 minutes until the cheese is bubbly.
Serving:
Remove from the oven and serve immediately. Garnish with cilantro and sour cream.
Monday, March 22, 2010
Blueberry & Banana Parfait
Breakfast is undoubtedly my favorite meal of the day. You would be surprised at how a big balanced breakfast can fuel your body to sustain the pressures of your daily routine. No matter how much you travel or how stressful your job is, a healthy breakfast is your password to a bright, energetic and happy day. In today's fast paced life, I believe it is the need of every family to watch what they eat for breakfast although they may not be able to make this meal their family meal.
Lately, we have been skipping breakfasts for one reason or the other, starting our day with a heavy dose of caffeine and eating heavy in the evenings. As a result, we get grumpy during the day, overeat in the evenings & feel fatigued and bloated the following morning.
This blueberry and banana parfait did a marvellous job of breaking this vicious cycle. It gave us something incredibly delicious to indulge in as we started our day. This balanced whole meal has the capacity to keep your body fueled for a busy morning. You get your carbs, calcium & protein as well as your berries & fruit in a single delightful bowl. This was our ultimate solution to ensuring that we ate our 'breakfast like a king'.
Blueberry & Banana Parfait
Serves 2
Ingredients:
1 large banana, thinly sliced
6 oz packet of blueberries, washed
1 cup granola of choice (I used 7 grain granola)
2 cups plain yogurt
4 TBS sugar
Method:
Mix the sugar and yogurt in a bowl. Take two glass cups or parfait bowls. Arrange the granola, fruit, yogurt & berries in alternate layers. You can create as many or as little layers as you like depending on the size of your parfait bowls.
Serving:
Serve immediately at room temperature or chill for 15 -20 minutes before serving. Cover & store in the fridge if preparing in advance. This can be prepared a day in advance.
Notes:
1. Replace the fruits & berries with what you have at hand.
2. You can substitute the plain yogurt with some flavored yogurt or try Greek yogurt for some extra thickness.
3. Add any nuts of your choice for some added crunch.
4. Use maple syrup or agave nectar as a natural sweetener in place of sugar.
Enjoy!
Tuesday, March 9, 2010
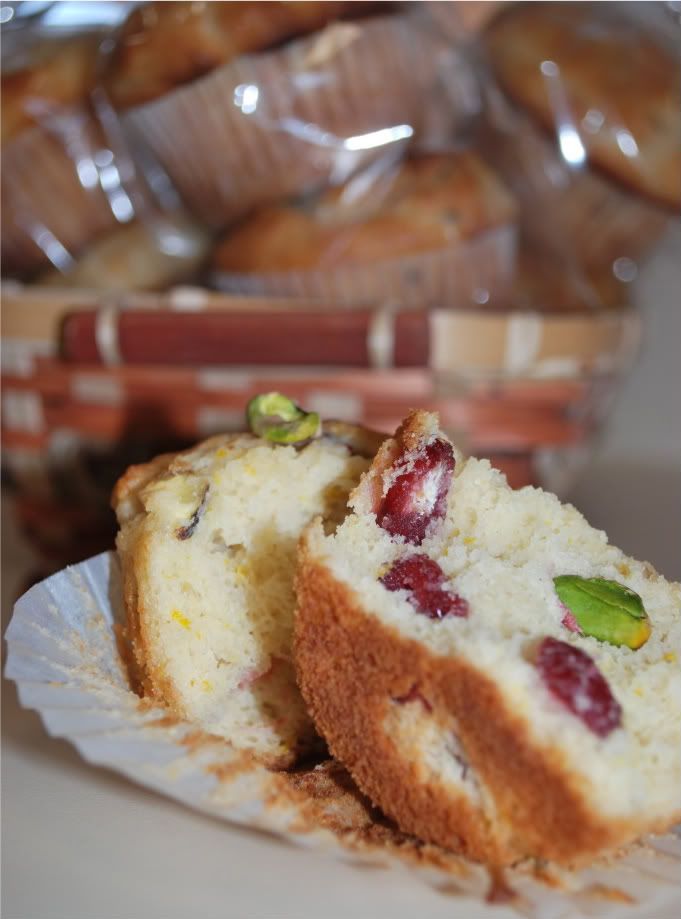
Cranberry & Pistachio Bran Muffins with Orange Zest
I know, I know...Christmas is still a long way away....you folks are probably wondering what these bright red and green colors are doing here at this time of the year? Here's what... I had stumbled upon some high quality pistachios and dried cranberries while grocery shopping one weekend in February. I had to buy them, but first I had to think of a recipe I would use them in. That wasn't difficult at all and the result was these moist, delicious and nutty muffins. I shared them with some of my friends, some of whom actually made them at home. I got rave reviews and all of them told me how delighted they were to bake them. I was ecstatic!
With that verdict I set off with my whisk and those rich quality ingredients to try a newer, healthier version of the original muffins. This time by substituting some of the all purpose flour with bran. Yeah! And it was a success! The bran gave a wonderful, nutty texture to these muffins which complimented the sweetness of the cranberries. Pistachios, which are my all time favorite, provide the perfect crunch along with some rich buttery goodness.
I will still be playing around with this recipe to incorporate more whole grain flour, reducing the butter, changing the baking temperature to get an appealing golden brown crust. But for now here is the recipe to these gorgeous healthier muffins.
Cranberry & Pistachio Bran Muffins with Orange Zest
Makes 12 standard sized muffins
Ingredients:
Dry Ingredients-
1 cup all purpose flour, sifted
3/4 cup wheat bran
1 tbs baking powder
3/4 cup cranberries, sweetened
1/3 cup pistachios, unsalted & unroasted
Pinch of salt
Wet Ingredients-
2/3 cup whole milk, room temperature
1 stick unsalted butter (1/2 cup), melted
1 large egg, room temperature
1 tsp vanilla extract
1/4 cup apple sauce
3/4 cup granulated white sugar
1 tbs orange zest
Method:
Preheat the oven to 400 deg F. Line a standard muffin tin with muffin cups.
Mix all the dry ingredients in a bowl and set aside.
Mix all the wet ingredients in a 2 cup measuring bowl and whisk until well combined (Mixing in a measuring bowl just makes it easy to pour the wet ingredients in to the dry ingredients. You can mix the wet ingredients in any bowl).
Pour the wet ingredients over the dry ingredients. Using a rubber spatula fold the ingredients using minimal strokes. Do not over mix.
Fill each muffin cup with 1/4 cup batter.
Bake for about 13-15 minutes until the tops are golden brown. Allow them to cool in the pan for about 15 minutes and then transfer to the cooling racks.
Serving:
Enjoy with a cup of hot coffee for breakfast or as a snack.
Thursday, February 25, 2010
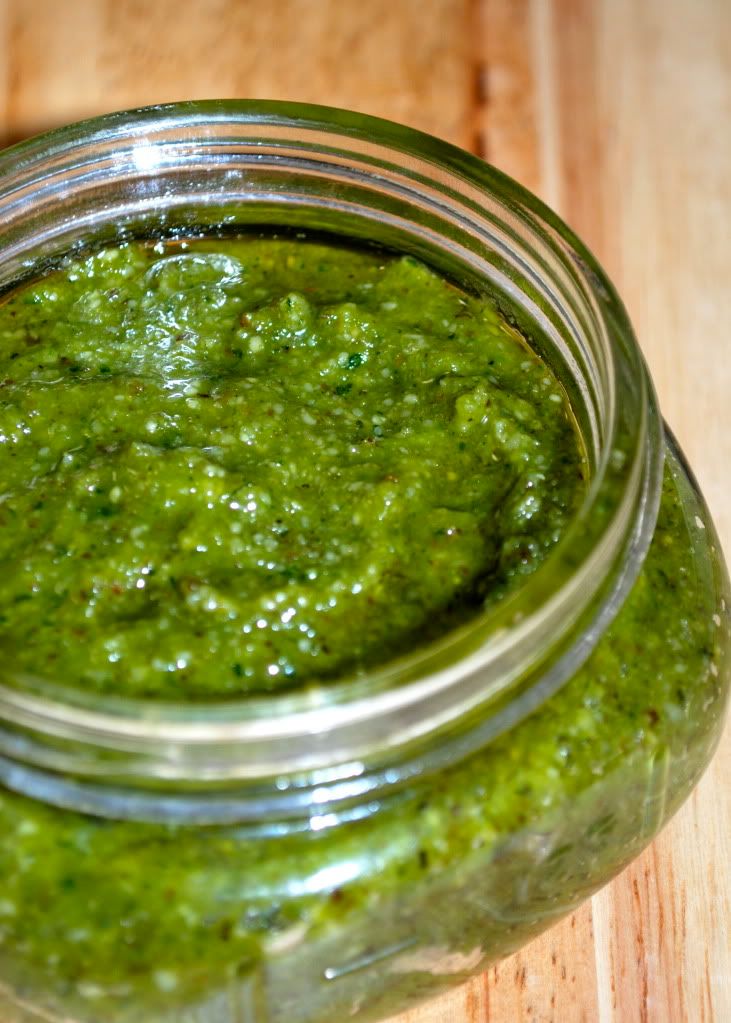
Basil Pesto
When it comes to hosting parties, we like to keep it simple these days. With Myra being so little, things may not go exactly the way we plan them. But that absolutely does not keep us from not having friends over for dinner at home.
This past weekend we hosted a fun pizza party at our house. While the kitchen was left in the hands of the men, we girls enjoyed chit chatting over a few drinks. The kids of course had a gala time with Myra crawling all over the place.
I'll write another post showcasing all the pizzas we prepared. For now, let me share this simple basil pesto recipe which we used as a topping for one of the pizzas.
I love pestos, and particularly this one for its versatility. It can be used as a spread on crostinis, tossed in with pastas, used as a marinade for grilling and even as a substitute for the regular tomato sauce on pizzas. The possibilities are endless. The only secret in making a good pesto, I think, is using fresh ingredients.
Basil Pesto
Yields about 1 1/2 cups
Ingredients:
2 cups fresh basil, packed
2 cloves of garlic
1/2 cup freshly grated Parmesan cheese
1/2 cup walnuts
1/2 cup good olive oil
Salt & Pepper
Method:
Add the basil, garlic, walnuts and salt and pepper in to the food processor. Process until the mixture looks minced, but not completely pureed. Then with the processor running, add the olive oil in a steady stream and process until the entire mixture is pureed. Add the cheese and process again for a minute.
You can use the pesto right away. It can also be stored for up to 6 weeks in air tight containers with a thin layer of olive oil on the top. This prevents the pesto from coming in contact with air and keeps the pesto fresh and green looking.
Serving:
Serve the pesto as a spread on crostinis, use it as a sauce for pizzas or as a marinade for grilling. Toss it on pastas or use it as a dressing for salads. You won't be wrong!
Note: This recipe yields a slightly thicker pesto. Use extra olive oil if you prefer a thinner consistency.
Tuesday, February 16, 2010
Cranberry & Pistachio Muffins with Orange zest
Boy, did I ever think it would be so much fun to play with kids? Not until this past Sunday! Myra had her first play date at home with some of our friends' kids that day. It wasn't anything formally arranged. A few of us friends had got together at a community function. As it ended and everyone was waving their final good byes, I just happened to ask if the kids wanted to come home to play with Myra. With approval from their respective parents, the kids, ranging in age from three to ten, headed home with us.
And the next thing we knew, Myra was having the time of her life. Our eight month old was laughing her heart out watching a seven year old do cart wheels. The kids enjoyed crawling in and out from the see through tunnel, playing peek a boo with Myra (absolutely her favorite!), reading her favorite stories and singing some classic rhymes for her. The added fun factor was that they were allowed to hold Myra, pick her up, sit her on their laps and drive her in her mini car. And while Myra took her afternoon nap, all the kids enjoyed making sugar cookies and watching their favorite movie. We did not want the fun to end.
We went to bed happy and dreamed of all the fun things we did during the evening. We woke up the next morning to these scrumptious cranberry pistachio muffins and coffee. The sweetness of the cranberries and the nuttiness from the pistachios go along very well. The orange zest gives the perfect tang in every bite of this muffin. Additionally they are easy to make and can be put together in no time.
Cranberry & Pistachio Muffins with Orange Zest
Makes 12 standard sized muffins
Ingredients:
Dry Ingredients-
1 3/4 cups all purpose flour
1 tbs baking powder
3/4 cup cranberries, sweetened
1/3 cup pistachios, unsalted & unroasted
Pinch of salt
Wet Ingredients-
2/3 cup whole milk, room temperature
1 stick unsalted butter (1/2 cup), melted
1 large egg, room temperature
1 tsp vanilla extract
1/4 cup apple sauce
3/4 cup granulated white sugar
1 tbs orange zest
Method:
Preheat the oven to 400 deg F. Line a standard muffin tin with muffin cups.
Mix all the dry ingredients in a bowl and set aside.
Mix all the wet ingredients in a 2 cup measuring bowl and whisk until well combined (Mixing in a measuring bowl just makes it easy to pour the wet ingredients in to the dry ingredients. You can mix the wet ingredients in any bowl).
Pour the wet ingredients over the dry ingredients. Using a rubber spatula fold the ingredients using minimal strokes. Do not over mix.
Using an ice cream scoop fill the muffin cups about 1/2 to 3/4 way up leaving room for the muffins to rise as they bake.
Bake for about 13-15 minutes until the tops are golden brown. Allow them to cool in the pan for about 15 minutes and then transfer to the cooling racks.
Serving:
Enjoy with a cup of hot coffee for breakfast or as a snack.
Saturday, January 23, 2010
Grilled Vegetables with Cilantro Sauce
It has been over a year now since I published my last post. Phew! what a year? Nothing in our life so far has been more exciting, exhilarating and exhausting, all at the same time. I call it the triple "E" effect. We are now blessed with a little baby girl, Myra. A lot of other changes have occured as well. First, I quit my job to be mom in chief (!), Pratik started working on his new post-doctoral position, my brother-in-law got married, my sister got married, we moved to a new city and to top it all, we made some exciting friends in our new town....families we truly like spending time with. What more could we ask for?
So now, as Myra is peacefully napping, I decided to get down to writing some serious stuff. You see, we have been cooking some great food inspite of the never ending everyday list of things to do with a now eight month old. However, coming up with something, taking good photographs and then blogging about it does require a lot of time. Right now things seem to have fallen back in shape and it looks like we are almost starting to follow some sort of schedule. But then again, this might not be my come back post. I will be blogging sporadically, Myra being my priority. Of course, I will brag about my new role as a mom in the posts to follow. Right now, I have exactly one hour before my little girl wakes up to play her 100th peek-a-boo adventure.
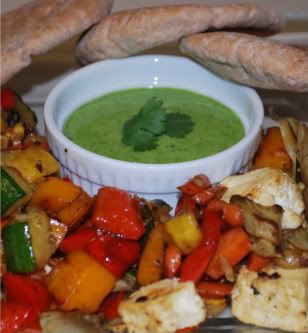
I hope you enjoy these delicious grilled vegetables and paneer as much as we did. The cilantro sauce adds freshness to the vegetables and paneer giving them a creamy texture. It is full of flavors and will warm your taste buds on a cold winter day. We ate ours with petite pita pockets but you can let your imagination run wild on how to serve them.
Grilled Vegetables and Paneer with Fresh Cilantro Sauce
Ingredients:
1 red bell pepper, cubed
1 yellow bell pepper, cubed
1 zucchini, cubed
1 yellow squash, cubed
1 carrot, cubed
1/2 cup of paneer, cubed
1/3 cup of butternut squash, peeled and cubed
Olive oil
Salt
Pepper
For the sauce-
1 cup of fresh cilantro, chopped
2 tbs olive oil
1 tbs plain yogurt
2-3 tbs mayonnaise
1 tsp maple syrup
2 tsp lemon juice
Salt & Pepper
Method:
Get your indoor grill pan screaming hot. Drizzle with some good olive oil to coat the bottom of the pan completely.
Grill all the vegetables evenly on all sides, tossing and turning every couple of minutes. Season with salt and pepper. Remove them from the grill pan onto a platter and then grill the paneer cubes until they turn golden brown. Season the paneer with salt and remove onto the platter.
Cilantro sauce:
Put all the ingredients for the sauce in a blender and blend together to make a fine paste.
Serving:
Serve on a big platter with the cilantro sauce kept in a bowl at the center. Alternately, toss the sauce with the grilled veggies and paneer and serve in a bowl. Goes well with charred pita pockets, tossed into some cooked pasta or on a bed of cooked wild rice or even as a side itself.
This recipe is packed with the fiber and vitamins from the vegetables, protein from the paneer, carbs from the pita bread or pasta. The cilantro in the sauce is a great digestive.
All in all, this recipe is quick, good and healthy for you!
Subscribe to:
Posts (Atom)